반응형
Notice
Recent Posts
Recent Comments
Link
| 일 | 월 | 화 | 수 | 목 | 금 | 토 |
|---|---|---|---|---|---|---|
| 1 | 2 | 3 | 4 | 5 | 6 | 7 |
| 8 | 9 | 10 | 11 | 12 | 13 | 14 |
| 15 | 16 | 17 | 18 | 19 | 20 | 21 |
| 22 | 23 | 24 | 25 | 26 | 27 | 28 |
Tags
- Oracle
- 평일코딩
- 정보처리기사실기정리
- typescript
- ReactNative
- 오라클
- 코딩테스트
- 자스코테
- 자바의정석
- 리액트
- 타입스크립트
- spring
- php
- 정보처리기사요약
- 국비IT
- 리액트네이티브
- react
- CSS
- VUE
- 정보처리기사
- 스프링
- 정보처리기사정리
- 자바스크립트
- 국비코딩
- 이안의평일코딩
- 정보처리기사실기요약
- 자바스크립트 코딩테스트
- Java의정석
- javascript
- 정보처리기사실기
Archives
- Today
- Total
이안의 평일코딩
[ReactNative] 리액트네이티브 (3) - To do 앱 본문
반응형

보통 리액트 네이티브를 첫 입문했을 때 API를 fetch해와서 Movie App을 만들거나 (Pokemon App도 만들긴함 ㅎㅎ)
아니면 CRUD을 첨가한 ToDo App을 만드는데 오늘은 간단하게 To do 앱을 만들어 보도록 하자.
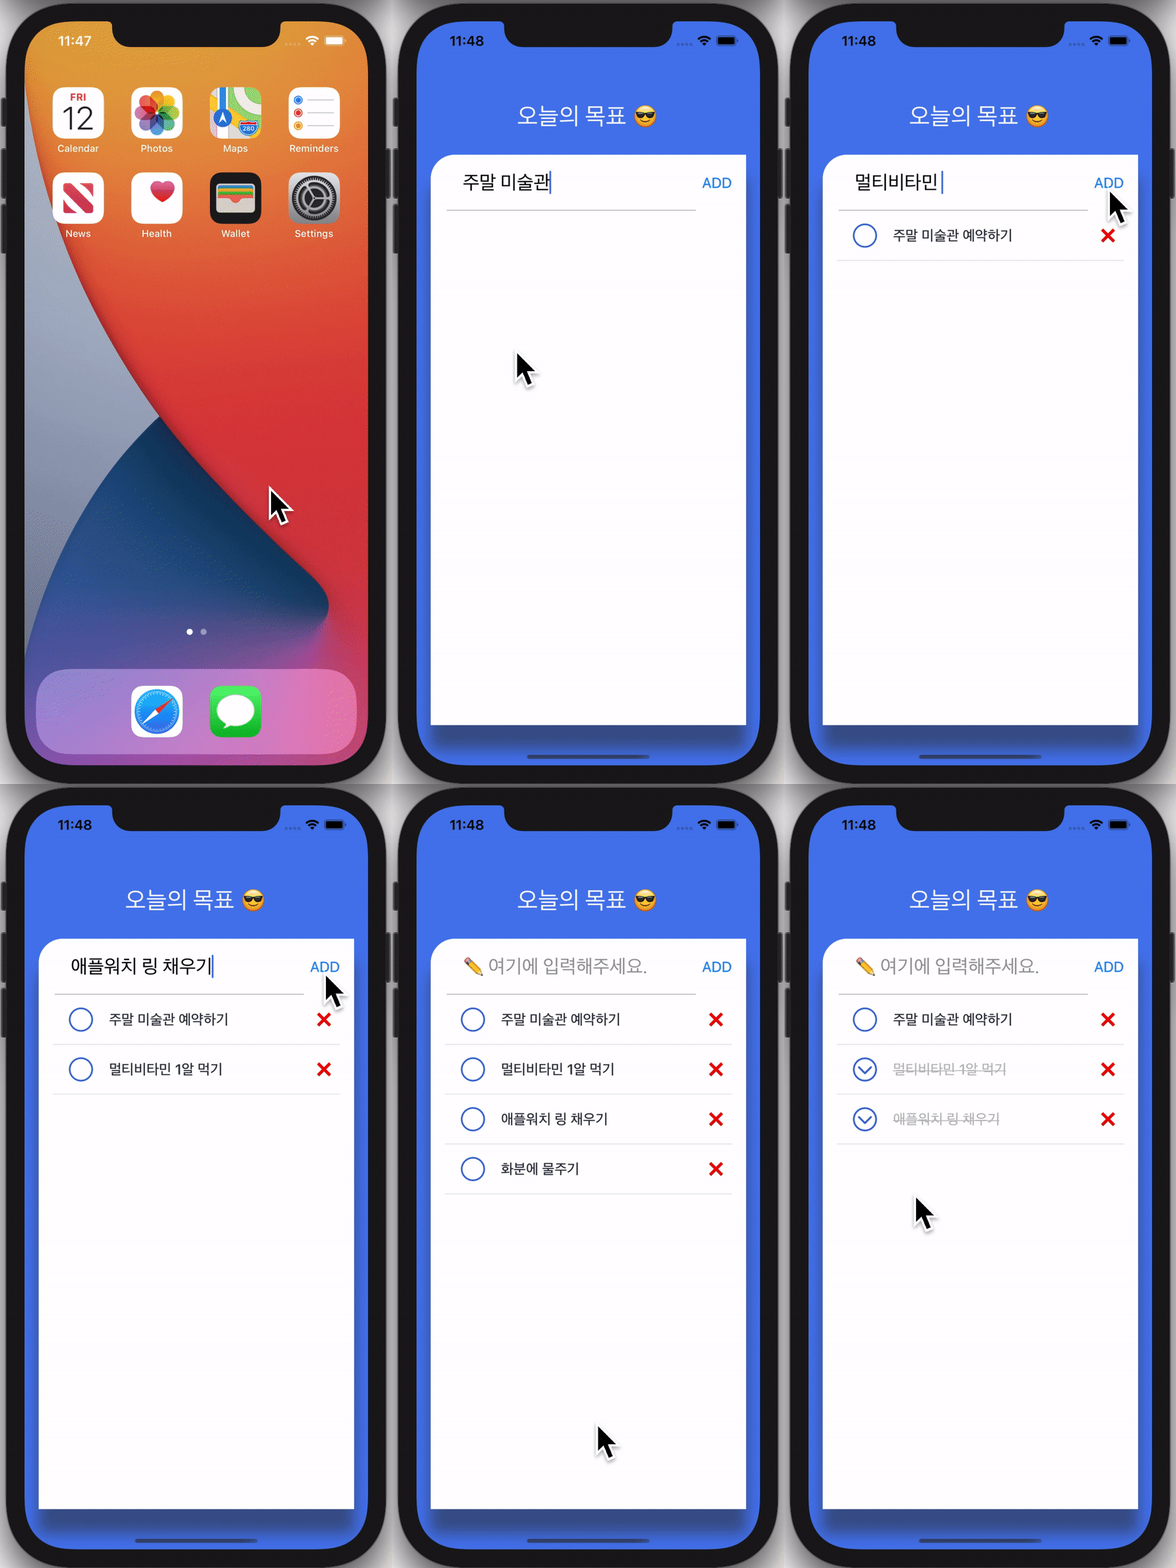
결과물

VScode를 IDE로, Expo CLI를 이용했고 할일을 추가하고 체크하거나 아니면 X 아이콘을 눌려 삭제시키는 간단한 투두앱이다.
App.js
import { StatusBar } from 'expo-status-bar';
import React, { useState } from 'react';
import { Text, StyleSheet, View, Dimensions, Platform } from 'react-native';
import uuid from 'react-uuid';
import TodoInsert from './components/TodoInsert';
import TodoList from './components/TodoList';

const { height, width } = Dimensions.get("window");

const App = () => {
  const [Todos, setTodos] = useState([]);

  const addTodo = text => {
    setTodos([...Todos,
      {id: uuid(), textValue: text, checked: false}, // check true면 완료
    ]);
  };

  const onRemove = id => e => {
    setTodos(Todos.filter(Todo => Todo.id !== id));
  };

  const onToggle = id => e => {
    setTodos(
      Todos.map(Todo =>
        Todo.id === id ? {...Todo, checked: !Todo.checked} : Todo,
      ),
    );
  };

  return (
    <View style={styles.container}>
      <StatusBar style="auto" />
      <Text style={styles.title}>오늘의 목표 😎</Text>
      <View style={styles.card}>
        <TodoInsert onAddTodo={addTodo} />
        <TodoList Todos={Todos} onRemove={onRemove} onToggle={onToggle} />
      </View>
    </View>
  );
}

const styles = StyleSheet.create({
  container: {
    flex: 1,
    backgroundColor: "#4b7bec",
    padding: 50,
    alignItems: "center"
  },
  title: {
    color: "white",
    fontSize: 30,
    marginTop: 50,
    fontWeight: "400",
    marginBottom: 30,
    textAlign: "center",
  },
  card: {
    backgroundColor: "white",
    flex: 1,
    width: width - 35,
    borderTopLeftRadius: 30,
    borderTopRightRadius: 0,
    ...Platform.select({
      ios: {
        shadowColor: "rgb(50, 50, 50)",
        shadowOpacity: 0.5,
        shadowRadius: 10,
        shadowOffset: {
          height: 30,
          width:0
        }
      },
      android: {
        elevation: 3
      }
    }),
  },
});

export default App;
components/TodoInsert.js
// 텍스트 입력창 & 추가 버튼
import React, {useState} from 'react';
import {Button, StyleSheet, TextInput, View} from 'react-native';

const TodoInsert = ({onAddTodo}) => {
    const [NewTodoItem, setNewTodoItem] = useState('');
    const todoInputHandler = newTodo => {
        setNewTodoItem(newTodo);
    };
    const addTodoHandler = () => {
        onAddTodo(NewTodoItem);
        setNewTodoItem('');
    };

    return (
        <View style={styles.inputContainer}>
            <TextInput
                style={styles.input}
                placeholder="✏️ 여기에 입력해주세요."
                placeholderTextColor={'#999'}
                onChangeText={todoInputHandler}
                value={NewTodoItem}
                autoCorrect={false}
            />
            <View style={styles.button}>
                <Button title={'ADD'} onPress={addTodoHandler} />
            </View>
        </View>
    );
};

const styles = StyleSheet.create({
    inputContainer: {
        flexDirection: 'row',
        justifyContent: 'space-between',
        alignItems: 'center',
    },
    input: {
        flex: 1,
        padding: 20,
        borderBottomColor: '#bbb',
        borderBottomWidth: 1,
        fontSize: 24,
        marginLeft: 20,
    },
    button: {
        marginRight: 10,
    },
});

export default TodoInsert;
components/TodoList.js
// 추가된 아이템을 스크롤 뷰를 통해 보여주는 부분
import React from 'react'
import { StyleSheet, ScrollView } from 'react-native'
import TodoListItem from './TodoListItem'

const TodoList = ({Todos, onRemove, onToggle}) => {
    return (
        <ScrollView contentContainerStyle={styles.listContainer}>
            {Todos.map(Todo => (
                <TodoListItem
                    key={Todo.id}
                    {...Todo}
                    onRemove={onRemove}
                    onToggle={onToggle}
                />
            ))}
        </ScrollView>
    );
};

const styles = StyleSheet.create({
    listContainer: {
        alignItems: 'center',
    },
});

export default TodoList;
components/TodoListItem.js
// 추가된 아이템 하나를 나타내는 부분, 완료 여부 상태값, 체크 이벤트
import React from 'react';
import { View, Text, StyleSheet, TouchableOpacity, Dimensions } from 'react-native';
import Icon from 'react-native-vector-icons/AntDesign';

const { width, height } = Dimensions.get("window");

const TodoListItem = ({textValue, id, checked, onRemove, onToggle}) => {
    return (
        <View style={styles.container}>
            <TouchableOpacity onPress={onToggle(id)}>
                {checked ? (
                    <View style={styles.completeCircle}>
                        <Icon name="circledowno" size={30} color="#3867d6" />
                    </View>
                ) : (
                    <View style={styles.circle} />
                )}
            </TouchableOpacity>
            <Text style={[styles.text,
                checked? styles.strikeText : styles.unstrikeText,]}>
                {textValue}
            </Text>
            <TouchableOpacity style={styles.buttonContainer}>
                <Text onPress={onRemove(id)}>
                ❌
                </Text>
            </TouchableOpacity>
        </View>
    );
};

const styles = StyleSheet.create({
    container: {
        width: width - 70,
        flex: 1,
        borderBottomColor: '#bbb',
        borderBottomWidth: StyleSheet.hairlineWidth,
        flexDirection: 'row',
        alignItems: 'center',
        justifyContent: 'space-between',
    },
    text: {
        flex: 5,
        fontWeight: '500',
        fontSize: 18,
        marginVertical: 20,
        width: 100,
    },
    circle: {
        width: 30,
        height: 30,
        borderRadius: 15,
        borderColor: '#3867d6',
        borderWidth: 2,
        marginRight: 20,
        marginLeft: 20,
    },
    completeCircle: {
        marginRight: 20,
        marginLeft: 20,
    },
    strikeText: {
        color: '#bbb',
        textDecorationLine: 'line-through',
    },
    unstrikeText: {
        color: '#29323c',
    },
    buttonContainer: {
        marginVertical: 10,
        marginHorizontal: 10,
    },
});

export default TodoListItem;
TouchableOpacity는 버튼기능으로 Button 컴포넌트는 ios와 android가 다르게 보이기 때문에 대신 사용한다.
해당 소스코드
github.com/ianlee92/ReactNative-todoapp
ianlee92/ReactNative-todoapp
Contribute to ianlee92/ReactNative-todoapp development by creating an account on GitHub.
github.com
반응형
'Front-end > ReactNative' 카테고리의 다른 글
| [ReactNative] 리액트네이티브 색상, 이미지, 구글폰트 넣기 (0) | 2021.03.16 |
|---|---|
| [ReactNative] 리액트네이티브 프로젝트 Setting (0) | 2021.03.16 |
| [ReactNative] 리액트네이티브 (2) - 기본 구성 (0) | 2021.03.11 |
| [ReactNative] 리액트네이티브 (1) - Expo 설치 및 실행 (0) | 2021.03.10 |
Comments


