
| 일 | 월 | 화 | 수 | 목 | 금 | 토 |
|---|---|---|---|---|---|---|
| 1 | 2 | 3 | 4 | 5 | 6 | |
| 7 | 8 | 9 | 10 | 11 | 12 | 13 |
| 14 | 15 | 16 | 17 | 18 | 19 | 20 |
| 21 | 22 | 23 | 24 | 25 | 26 | 27 |
| 28 | 29 | 30 | 31 |
- 정보처리기사요약
- 정보처리기사실기
- 자바스크립트
- Oracle
- VUE
- ReactNative
- 자바의정석
- 국비IT
- 스프링
- 평일코딩
- 자바스크립트 코딩테스트
- 정보처리기사실기정리
- 정보처리기사실기요약
- 이안의평일코딩
- 리액트
- react
- typescript
- 자스코테
- 코딩테스트
- 국비코딩
- 정보처리기사
- spring
- 리액트네이티브
- php
- javascript
- CSS
- 타입스크립트
- 오라클
- 정보처리기사정리
- Java의정석
- Today
- Total
이안의 평일코딩
[React 기초] 생활코딩 리액트 수업 요약 정리 본문

리액트를 시작하다!
리액트 입문 수업으로 생활코딩을 이틀에 걸쳐 완강했다. (수업링크 : opentutorials.org/module/4058)
TMI이지만 사실 국비 과정이 풀스택인줄 알았는데 강의 중간 쯤 알고보니 백엔드 반이라는 사실을 깨달았다.
1차, 2차, 3차 프로젝트를 거치면서 점점 백엔드보다는 프론트엔드에 강력한 매력을 느끼게 되었고 독학을 결심.
이 글은 생활코딩님의 리액트 강의를 듣고 복습 겸 다시 정리해보는 글이오니,
글의 설명이 부족하다고 느낀다면 위의 수업링크를 통해 한 번 수강할 것을 적극 추천하며,
복습용으로 또는 오랜만에 상기용으로 빠르게 훑고 싶은 분들을 위한 글이라고 생각하면 될 것같다.
개발환경
npm run start
public > index.html (메인페이지)
public디렉토리의 index.html는 웹 브라우저에 출력되는 곳이며 div안에 Component가 들어간다.
<div id="root"></div>src > index.js
import React from 'react';
import ReactDOM from 'react-dom';
import './index.css';
import App from './App';
import * as serviceWorker from './serviceWorker';

ReactDOM.render(<App />, document.getElementById('root'));

serviceWorker.unregister();
src디렉토리의 index.js는 Entry(진입)파일로 자바스크립트의 선택자처럼 id값이 'root'인 index.html파일의 root를 지정해준다.
그리고 App은 리액트를 통해 만든 사용자 정의 태그인 Component의 실제구현을 import를 통해 App.js파일을 불러온다.
src > App.js (메인페이지에 들어갈 HTML을 짜는 곳)
import React, { Component } from 'react';
import './App.css';

class App extends Component {
  render() {
    return(
      <div className="App">
        Hello, React!!
      </div>
    );
  }
}

export default App;
src디렉토리의 App.js는 실제 태그의 내용을 구현하는 장소이다.
즉, 우리가 코딩을 하는 곳이라고 생각하면 쉽다.
터미널에 npx create-react-app 프로젝트명 입력하면 프로젝트 생성이 가능하다
node_modules: 라이브러리 모은 폴더
public: static 파일 보관함
src: 소스코드 보관함(실질적 코딩하는 곳)
package.json: 설치한 라이브러리 목록
class: 변수/함수 보관하는 덩어리
extends: 상속
컴포넌트 만들기
React의 핵심 기능으로 App이라는 클래스를 만들고 Componenet를 상속하며 render라는 메소드를 가지고 있다.
복잡도를 획기적으로 낮추고 정리정돈용으로 사용한다고 생각하면 된다.
src > App.js
import React, { Component } from 'react';
import './App.css';

class Subject extends Component { // Subject: 제목
  render(){
    return (
      <header> // 컴포넌트는 반드시 하나의 최상위 태그만 사용
          <h1>포켓몬</h1>
          넌 포켓몬 마스터다!
      </header>
    );
  }
}

class TOC extends Component{ // TOC: 목차(Table Of Content)
  render(){
    return (
      <nav> // 최상위 태그
          <ul>
              <li><a href="1.html">꼬부기</a></li>
              <li><a href="2.html">파이리</a></li>
              <li><a href="3.html">이상해씨</a></li>
          </ul>
      </nav>
    );
  }
}

class Content extends Component{ // Content: 내용
  render(){
    return (
      <article> // 최상위 태그
          <h2>꼬부기</h2>
          물 포켓몬
      </article>
    );
  }
}

class App extends Component {
  render() {
    return (
      <div className="App"> // 최상위 태그
        <Subject></Subject>
        <TOC></TOC>
        <Content></Content>
      </div>
    );
  }
}

export default App;
props
props는 속성(attribute)을 가르키며 this.props.속성명을 이용, 리팩토링해서 코드를 간결화시키는 역할을 맡는다.
src > App.js
import React, { Component } from 'react';
import './App.css';

class Subject extends Component {
  render(){
    return (
      <header>
          <h1>{this.props.title}</h1>
          {this.props.sub}
      </header>
    );
  }
}

class TOC extends Component{
  render(){
    return (
      <nav>
          <ul>
              <li><a href="1.html">꼬부기</a></li>
              <li><a href="2.html">파이리</a></li>
              <li><a href="3.html">이상해씨</a></li>
          </ul>
      </nav>
    );
  }
}

class Content extends Component{
  render(){
    return (
      <article>
          <h2>{this.props.title}</h2>
          {this.props.desc}
      </article>
    );
  }
}

class App extends Component {
  render() {
    return (
      <div className="App">
        <Subject></Subject>
        <Subject title="포켓몬" sub="넌 포켓몬 마스터다!"></Subject>
        <TOC></TOC>
        <Content></Content>
        <Content title="꼬부기" desc="물 포켓몬"></Content>
      </div>
    );
  }
}

export default App;
컴포넌트 파일로 분리하기
App.js파일의 Component를 분리하면 관리하기가 용이해진다.
react라는 라이브러리에서 Component라는 클래스를 로딩해와서 import해서 사용하면 된다.
src > App.js
import React, { Component } from 'react';
import TOC from "./components/TOC";
import Content from "./components/Content"
import Subject from "./components/Subject"
import './App.css';

class App extends Component {
  render() {
    return (
      <div className="App">
        <Subject title="포켓몬" sub="넌 포켓몬 마스터다!"></Subject>
        <TOC></TOC>
        <Content title="꼬부기" desc="물 포켓몬"></Content>
      </div>
    );
  }
}
export default App;
src > components > Subject.js
import React, { Component } from 'react';
class Subject extends Component {
    render(){
      return (
        <header>
            <h1>{this.props.title}</h1>
            {this.props.sub}
        </header>
      );
    }
  }

export default Subject;
src > components > TOC.js
import React, { Component } from 'react';

class TOC extends Component{
    render(){
      return (
        <nav>
            <ul>
                <li><a href="1.html">꼬부기</a></li>
                <li><a href="2.html">파이리</a></li>
                <li><a href="3.html">이상해씨</a></li>
            </ul>
        </nav>
      );
    }
  }

export default TOC;
src > components > Content.js
import React, { Component } from 'react';

class Content extends Component{
    render(){
      return (
        <article>
            <h2>{this.props.title}</h2>
            {this.props.desc}
        </article>
      );
    }
  }

export default Content;
State
State는 props의 값에 따른 구현에 필요한 내부의 데이터를 가리킨다.
내부의 값을 외부로 부터 은닉화시키는 역할을 한다.
어떤 Component가 실행될 때 constructor함수가 있다면 render()함수보다 먼저 실행되어 초기화를 담당한다.
src > App.js
import React, { Component } from 'react';
import TOC from "./components/TOC";
import Content from "./components/Content"
import Subject from "./components/Subject"
import './App.css';


class App extends Component {
  constructor(props){
    super(props);
    this.state = {
      subject:{title:'포켓몬', sub:'넌 포켓몬 마스터다!'}
    }
  }
  render() {
    return (
      <div className="App">
        <Subject
          title={this.state.subject.title}
          sub={this.state.subject.sub}></Subject>
        <TOC></TOC>
        <Content title="꼬부기" desc="물 포켓몬"></Content>
      </div>
    );
  }
}
export default App;state는 constructor 안에 작성
constructor: class의 변수/초기값 저장할 때 사용
key
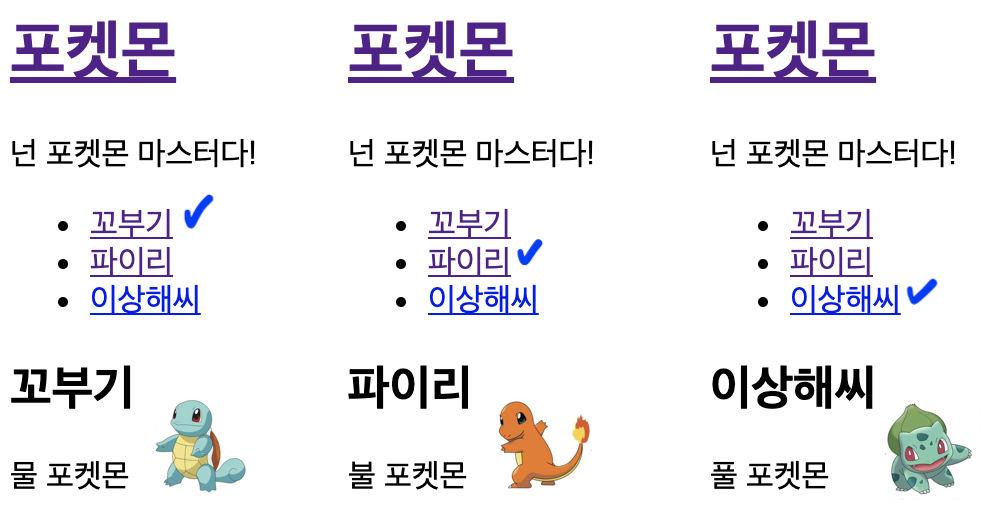
여러개의 element를 생성하는 경우에는 key라고 하는 특수한 props를 가지고 있어야 한다.
구분할 수 있는 식별자를 key값으로 넣는다.
src > App.js
import React, { Component } from 'react';
import TOC from "./components/TOC";
import Content from "./components/Content"
import Subject from "./components/Subject"
import './App.css';
class App extends Component {
  constructor(props){
    super(props);
    this.state = {
      subject:{title:'포켓몬', sub:'넌 포켓몬 마스터다!'},
      welcome:{title:'포켓몬고', desc:'나와 함께 모험을 떠나볼까?'},
      contents:[
        {id:1, title:'꼬부기', desc:'물 포켓몬'},
        {id:2, title:'파이리', desc:'불 포켓몬'},
        {id:3, title:'이상해씨', desc:'풀 포켓몬'}
      ]
    }
  }
  render() {
    return (
      <div className="App">
        <Subject
          title={this.state.subject.title}
          sub={this.state.subject.sub}>
        </Subject>
        <TOC data={this.state.contents}></TOC>
        <Content title="꼬부기" desc="물 포켓몬"></Content>
      </div>
    );
  }
}
export default App;
src > components > TOC.js
import React, { Component } from 'react';

class TOC extends Component{
    render(){
      var lists = [];
      var data = this.props.data;
      var i = 0;
      while(i < data.length){
        lists.push(<li key={data[i].id}><a href={"/content/"+data[i].id}>{data[i].title}</a></li>);
        i = i + 1;
      }
      return (
        <nav>
            <ul>
                {lists}
            </ul>
        </nav>
      );
    }
  }
export default TOC;
이벤트
이벤트는 props, State와 함께 애플리케이션을 리로드 하지않고 역동적으로 만들어준다.
function(e): 파라미터(매개변수)의 값으로 이벤트라는 객체를 주입해준다.
preventDefault()함수: e라고하는 객체에 속해 동작을 못하게 막는다. (리로드 방지)
TypeError: Cannot read property 'state' of undefined
<header>
 <h1><a href="/" onClick={function(e){
  console.log(e);
  e.preventDefault();
  //this.state.mode = 'welcome'; -> 오류 발생
  this.setState({
   mode:'welcome'
  });
 }.bind(this)}>{this.state.subject.title}</a></h1>
 {this.state.subject.sub}
</header>
이벤트가 호출되었을 때 실행되는 함수 안에서는 this의 값이 component 자신의 값이 아닌 아무것도 셋팅되어 있지 않다.
해결법: 함수가 끝난 직후에 .bind(this)를 추가해주면 된다.
this.setState라는 함수를 호출해서 인자로 바꾸고 싶은 mode를 안에 작성한다.
bind 함수
bind 함수를 호출해서 인자로 불러오면 this값을 불러올 수 있다.

setState 함수
state의 값을 직접 변경하면 render가 호출되지 않기 때문에 setState 함수의 형태로 값을 변경해야 된다.
src > App.js
<Subject
 title={this.state.subject.title}
 sub={this.state.subject.sub}
 onChangePage={function(){
   this.setState({mode:'welcome'});
 }.bind(this)}
>
</Subject>
src > components > Subject.js
<header>
 <h1><a href="/" onClick={function(e){
  e.preventDefault();
  this.props.onChangePage();
 }.bind(this)}>{this.props.title}</a></h1>
 {this.props.sub}
</header> onChangePage: 링크를 클릭했을 때 이벤트에 설치된 함수를 실행

src > App.js
import React, { Component } from 'react';
import TOC from "./components/TOC";
import Content from "./components/Content"
import Subject from "./components/Subject"
import './App.css';

class App extends Component {
  constructor(props){
    super(props);
    this.state = {
      mode:'read',
      selected_content_id:2,
      subject:{title:'포켓몬', sub:'넌 포켓몬 마스터다!'},
      welcome:{title:'포켓몬고', desc:'나와 함께 모험을 떠나볼까?'},
      contents:[
        {id:1, title:'꼬부기', desc:'물 포켓몬'},
        {id:2, title:'파이리', desc:'불 포켓몬'},
        {id:3, title:'이상해씨', desc:'풀 포켓몬'}
      ]
    }
  }
  render() {
    console.log('App render');
    var _title, _desc = null;
    if(this.state.mode ===  'welcome'){
      _title = this.state.welcome.title;
      _desc = this.state.welcome.desc;
    } else if(this.state.mode === 'read'){
      var i = 0;
      while(i < this.state.contents.length){
        var data = this.state.contents[i];
        if(data.id === this.state.selected_content_id) {
          _title = data.title;
          _desc = data.desc;
          break;
        }
        i = i + 1;
      }
    }
    return (
      <div className="App">
        <Subject
          title={this.state.subject.title}
          sub={this.state.subject.sub}
          onChangePage={function(){
            this.setState({mode:'welcome'});
          }.bind(this)}
        >
        </Subject>
        <TOC
          onChangePage={function(id){
            this.setState({
              mode:'read',
              selected_content_id:Number(id)
            });
          }.bind(this)}
          data={this.state.contents}
        ></TOC>
        <Content title={_title} desc={_desc}></Content>
      </div>
    );
  }
}
export default App;
src > components > TOC.js (목록)
import React, { Component } from 'react';
class TOC extends Component{
    render(){
      console.log('TOC render');
      var lists = [];
      var data = this.props.data;
      var i = 0;
      while(i < data.length){
        lists.push(
          <li key={data[i].id}>
            <a
              href={"/content/"+data[i].id}
              data-id={data[i].id}
              onClick={function(e){
                e.preventDefault();
                this.props.onChangePage(e.target.dataset.id);
              }.bind(this)}
            >{data[i].title}</a>
          </li>);
        i = i + 1;
      }
      return (
        <nav>
            <ul>
                {lists}
            </ul>
        </nav>
      );
    }
  }
export default TOC;
함수.target을 사용하면 이벤트 함수 내에서 이벤트가 소재하고 있는 a 태그(a href)를 가리킨다.
data-id={data[i].id} 속성을 부여, a태그를 알아낸 뒤 data-id 접미사 id의 값을 알아낸다.
Number()함수: 숫자로 변경할 때
'Front-end > React' 카테고리의 다른 글
| [React] boiler plate 로그인 & 회원가입 (0) | 2021.01.07 |
|---|---|
| [React] Redux 기초 문법(2) - reducer, dispatch 함수 (1) | 2021.01.03 |
| [React] Redux 기초 문법(1) - 설치 및 세팅 (0) | 2021.01.02 |
| [React] LifeCycle API (0) | 2020.12.13 |
| 국비 React - Spring과 연동하기 (0) | 2020.11.17 |


